Monday, December 19, 2011

More SR3D Builder

As an exercise, I decided to try modeling the 8441 B-model (racer) in SR 3D Builder. I am getting the hang of this program, and quite enjoyed putting together the rear end of the vehicle. I'm pleased to report that SR3D allowed me to model the front end, thanks to the hinge mode and the connection solver.

The nose is composed of a 3x5 90 degree beam (yellow) posed at an angle thanks to pink connector block and the light-blue beams. There are 4 hinges in the nose. I positioned the pink connector block and the light-blue beam in approximately the right place, then used the connection finder to "connect" the holes in the light-blue beam and the yellow 90 degree beam. The software repositioned the two pieces. Neat!

The software did make a boo-boo during an early attempt: the connection finder positioned one of the pieces into another one. Of course that was easily undone, and a different strategy solved the connection.

Mecanum Wheels

These look exciting..

Sunday, December 18, 2011

Lego Digital Designer

After I posted the previous entry about modeling the synchro drive in SR 3D Builder, I decided to try doing it in Lego Digital Designer.

  • Good: I love the way axles and pins just snap into holes, and vice versa. Much easier than either SR 3D or MLCad. The current version of SR 3D (0.6.0.9) has a feature called "automatic brick orientation" which offers a similar ability, but it's still marked as experimental, and doesn't feel as snappy as LDD's.
  • Good: Pan, zoom, and orbit control with the mouse is just like Google Sketchup. In contrast, SR 3D requires you to use a slider to zoom, and I haven't figured out the pan controls yet. (Update: hold down the middle button or both left and right mouse buttons at the same time.)
  • Good/bad: Collision detection is very good, but can be intrusive. It won't let you drop a piece where it intersects with another.
  • Good/bad: The building guide was easily generated. The building guide is also animated, and can be rotated and zoomed. But it created structures which will not fit without some disassembly.
  • Bad: without a pin in place, the software could not figure out where to put a studless beam.
  • Bad: Limited selection of parts and colours. For example, the 1/2 thick triangle shaped beam only comes in grey, red or black. In my personal collection, I have this item in blue, from an old Star Wars set. In the other programs, there is a wider selection of colour and even transparencies. I really enjoyed the fact that I could make the turntable a light transparent blue. It's such a large piece that leaving it all black makes the other pieces harder to see.
  • Bad: The division of parts into themes seems unnecessary.
  • Bad: The 12-tooth bevel gear is filed under the "Extended" theme, as a "conical wheel, z12". It does not show up searching for "bevel" or "gear". It's also only available in red
  • Bad: Bevel gears have a problem fitting. Couldn't figure out a solution to this one.

Here's what I was able to do. It was pretty easy to throw it together because of how easily pins and axles just fall together. But I had to leave out one of the bevel gears, and substitute a cross thingy for the 3482 wheel.

Synchro Drive in Lego (part 2)

Hooray for Lego CAD software! Here's what I used:
  • SR 3D Builder: After a few hours of poking around, I found this to be the easiest and nicest looking program for building Technic models.
  • MLCad: to import SR 3D's files (just open all file types) and to edit / reorder the build steps.
  • LPub: to generate the build instructions.
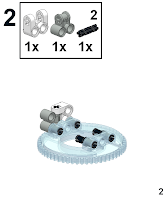
And here are the build instructions for my latest iteration of a syncro drive part:

Saturday, December 17, 2011

Synchro Drive in Lego

Here is my take on a synchro drive using Lego:

It's inspired by, but different from, aeh5040's creation in the following ways:

  • I used wheel 3482 and tire 3483 because I have a theory that it will help prevent "walking" when the mechanism is turned for steering. More on that theory later.
  • I used a 12-tooth bevel gear instead of a 20-tooth bevel gear, again to help prevent walking. I believe it is advantageous to employ a reduction in the final driving gears (perhaps because it means less torque in the vertical drive axis), so I may revisit this at another time.
  • The wheel is 1 stud further from the turntable to provide clearance for the wheel and tire. I admire the way aeh5040's design has just the right amount of space for it's pulley and tire. It feels "just so." But I couldn't replicate that with my tire choice. So the supporting triangles had to be attached to the turntable using parts 41678 and 32291.

My theory about walking is this. When the mechanism is turned for steering, the bevel gear attached to the wheel spins as it is rotated around the stationary drive axle. The amount it spins depends on the ratio between the two bevel gears. I chose the 12-tooth double bevel gear over the 20-tooth so the ratio would be 1:1. If the mechanism was "steered" 360 degrees, then the wheel would rotate 360 degrees as well.

I also believe that to prevent walking, the wheel's radius must be equal to its distance from the driving axle. Or, perhaps more correctly, the ratio of the wheel's radius and its distance from the driving axle must be equal(?) to the ratio between the two bevel gears.

I don't have time to draw up a diagram to explain this further, so I'll just leave it be for now.

Advantages of synchro drives in a robotics platform:

  • More energy efficient than scrub steering. This advantage is important if the robot is heavy or the surface has a high coefficient of friction.
  • Robot may be able to change direction quicker. For example, see this video.

Disadvantages of synchro drives in a robotics platform:

  • Robots built on a synchro platform driven by one motor do not rotate about their vertical axis. This is problematic if, for example, the mission involves gathering items off the floor and the intake is located only on one side of the robot. It's less of a problem if the mission allows for a swiveling "head" positioned on top. An obvious workaround to this problem is to employ two drive motors and find a way to counteract their different turning rates.
  • The steering and drive mechanisms take up a lot of room. In addition to the mechanism shown above, you need to add gears and axles to steer and to drive all four wheels from two motors. Compare this to a scrub-steer platform, which can be as simple as putting at each corner of the robot's frame a motor, 2 gears, and a wheel.

Some "final" notes about construction choices:

  • I used a longer-than-strictly-necessary axle for the wheel so it won't pop out during a competition.
  • The triangles can wobble because of the attachment method, so add an axle at each corner of their bases. To help position the triangles better, put bushings on the axles as well.

Additional resource: Sven Bottcher's Principles of robot locomotion

Tuesday, December 13, 2011

2005 Impreza headlight bulb replacement

I recently noticed that one of the low-beams in my 2005 Impreza had blown out. Upon closer inspection, both marker lights were gone too. Since the marker lights are incredibly difficult to access and since the plastic lenses have gotten cloudy, I decided to remove both headlights and work on them inside the house.

Removing the headlights was surprisingly straightforward, thanks to the instructions in the owner's manual and to these instructions on NASIOC. I just followed steps 1 through 8, and I had both headlights in the house in 30-45 minutes.

It was a balmy 5 degrees Celcius outside with little to no wind, so I was able to work in short sleeves. To combat the early onset of darkness, I used a Petzl 3-led headlamp and had on a small AAA necklight.

Both low beams got replaced by Sylvania XTRAVISION H1 XVs that I got from Crappy Tire for $29 per pair. The marker lights were 168LL (long life) jobbies from GE I think. Both got replaced as well, even though the left side marker light came back to life when I banged on the headlight. That worries me slightly. What worries me more is the right side marker light was just hanging outside the lamp assembly in its socket, like it hadn't been inserted properly the previous time. The light bulb was burnt out and cracked, which means it probably died due to exposure to rain or oil. That bulb was last changed at the dealership, but iirc, they didn't charge me for it.

The low beams are protected in the back by a large round plastic cover that was hard to twist off. The gasket had gotten dried, so I lubricated it with dielectric grease before reinstalling the covers. I also put a dab of dielectric grease on the plugs. Hope that wasn't the wrong thing to do...

To polish the lenses, I used Meguiare's PlastX. I hadn't done any research before I went shopping, so it was a toss up between that and RainX's version. The stuff works pretty good, and quickly. The finish on the lens feels like car wax. No surprise there, considering what Meguiar's is famous for. My lenses still have pits from stones and whatnot, though. To get a factory finish I'd probably have to break out the wet-dry sandpaper, which I didn't care to get into.

Reinstalling the headlights went quickly -- maybe 15 minutes. Again, the Petzl came in handy. All in all, I'm really pleased I decided to tackle the project tonight instead of waiting until the weekend. It went faster than I had feared it might, and now I have working lights up front again.

Next project: replace the dead bulb(s) in my instrument cluster.

Update: subjectively speaking, the work has been worth it. There seems to be more light coming out of the headlights. The colour temperature has not changed noticeably, which makes sense because the XVs are supposed to have a colour temperature of 3200K versus the stock 3100K. It's impossible to pin down which change made the biggest difference since I didn't do any controlled testing and I changed 3 (or possibly more) things in one go (cleaned lenses, replaced a broken low beam, replaced both low beams with new bulbs).

Also, I gave my console a friendly thump on the drive to work, and the dead light came back on. Who knew the Subie had so much in common with an Amiga 500?

Thursday, November 10, 2011

Netgear WNDR3700

Received a refurbished Netgear WNDR3700 from TigerDirect today. The unit turned out to be a version 1, which was a bit of a bummer because v2 has a larger flash ROM. But no biggy, 8MB should still be big enough for DDWRT.

So I proceeded to install DDWRT, but things did not go smoothly. This step was problematic:

1a. Download DD-WRT for the WNDR3700 v1 from here depending on the region you purchased your router from: North America (NA): ftp://ftp.dd-wrt.com/others/eko/BrainSlayer-V24-preSP2/2011/06-14-11-r17201/netgear-wndr3700/wndr3700-factory_NA.img
That image left the router in a "boot loop". The only way to recover from that was the 45-second reset and then reinstall a factory image using tftp over a wire connection. Fortunately my old router was still working, so it was not difficult to download the factory image from Netgear.

I next installed OpenWRT, which went on smoothly. I was dismayed to discover that wireless was not installed by default, and that I would have to download packages and read documentation (I know, gasp) in order to figure it out. I wasn't in the mood for that, I just wanted plug and play, so I decided to try DDWRT again.

This time I followed the alternate instructions, which were to install the older 16785 revision and then upgrade to 17201 using the "webflash.bin" file. Fortunately this worked.

I had to install 16785 twice in order to get 17201 on it because after my initial success, I started to play around with some options. Somehow this left the 3700 in a completely useless state, so I had to start over again from the 45-second paperclip trick. The second time was a charm. The steps I followed were:

  • Reset the router using the 45-second paper clip trick. The power LED should blink green
  • Connect an ethernet cable to the router, configure the interface as static 192.168.1.3/24, and "tftp -i 192.168.1.1 PUT wndr3700_factory_NA.img" (the 16785 revision).
  • Wait for the router to reboot, do the 30/30/30 trick to reset DDWRT to default configuration.
  • Browse over to 192.168.1.1, and upgrade to 17201 using the webflash.bin file.
  • Reboot, 30/30/30.
  • Configure DDWRT so the router to act only as an access point

That's pretty much it, aside from setting up the wireless security settings. So far so good, 29 days left in the 30 day warranty. If it dies, then I'll have something to take apart.

Thursday, October 6, 2011

The Bose QC15 headphones do an amazing job of cutting down airplane cabin noise. Everytime someone tried them on, their eyes went wide in amazement. They even did a better job of cutting down noise than plain old earplugs.

The best part about the QC15s is this:

The end with the switch plugs into the headphones. The "hi" setting is for your everyday MP3 player, cellphone, etc. The "lo" setting is for the airplane sound system. It keeps your ears from being blasted when the pilot or cabin crew make an announcement while you are watching a movie.

Wednesday, October 5, 2011

The Joy of Cup Noodles

Nissin Cup Noodles made an ordinary meal on a recent 15 hour flight into the best one ever. I eat a lot of instant noodles because it goes so well with all the vegetables we get in our CSA box, but I don't normally drink the "soup". Not during this flight though. With the sandwich that was served on the side, the Cup Noodles and its soup made for a nice hot lunch.

Friday, September 23, 2011

Bus Pirate DIY "case"

A little DIY case I threw together using a ruler, an Exacto knife, plastic from a blister pack, and some 4-40 hardware I had lying around:

It's not especially protective, but it will keep random stuff from falling on it and shorting something out.

The trick to making this is to start with the rectangular hole for the guarded probe connector because it's the hardest part to get right. Once you have cut a hole you like, use the edges of the Bus Pirate itself as a guide and lightly score the other edges one at a time to mark them. Use a straight edge to cut the marks deeper. It's faster to finish the cuts with scissors.

If you're not familiar with 4-40 hardware: 4-40 is a standard thread size. You can find 4-40 hardware in serial, parallel, and video D-sub connectors. They're often used in RC models too, judging from a quick ebay search. Sometimes the hardware store will carry 4-40 nuts and bolts.

Tuesday, September 13, 2011

NFS4 id fixes

I was having a problem with ids on an NFSv4 client:

$ ls -l /r1/bob/
drwxr-xr-x  2 4294967294 4294967294 4096 2011-05-14 19:29 junk
drwxr-xr-x  2 4294967294 4294967294 4096 2011-01-30 02:14 junk2
drwxr-xr-x 14 4294967294 4294967294 4096 2011-05-14 16:31 unsorted_junk

After fumbling around for a bit, here is the solution I'm running with now.

On both the server and the client, add this to /etc/idmapd.conf:

[Translation]
Method = nsswitch

On the client, add this /etc/rc.local:

service idmapd start
umount /r1
mount /r1

Now we're all good:

$ ls -l /r1/bob/
drwxr-xr-x  2 bob bob 4096 2011-05-14 19:29 junk
drwxr-xr-x  2 bob bob 4096 2011-01-30 02:14 junk2
drwxr-xr-x 14 bob bob 4096 2011-05-14 16:31 unsorted_junk

Monday, September 5, 2011

Boston Baked Beans

One of Mrs Squirrel's favourites, this is based on the recipe from the 1997 edition of The Joy of Cooking.

  • Total cooking time: 6-8 hours.
  • Ingredients:
    • 2 lbs white navy beans
    • 1 cup light or dark molasses
    • 8 oz salt port
    • 2 cups chopped onions
    • 2 tsp ground black pepper
    • 1/2 tsp ground cloves
    • water
  • Makes about 10 cups of baked beans, which will keep in the refrigerator up to 1 week, or frozen and enjoyed up to 6 months later.

Step 1: Cook the beans

The goal of this step is to get 2 lbs of white navy beans to the point where they are soft and creamy in the centre. Ideally, the skins should not not be frayed, nor should the beans be mushy and falling apart.

Pick over and wash 2 lbs white navy beans. Place in a pot and add 12 cups water. Boil for 2 minutes, then cover and let stand for 1 hour.

Bring the beans back to a boil and simmer for 45-60 minutes, until the beans are done, as described above.

If you're using a different species of bean, the required cooking times may differ from the above. For example, one species of small red beans required an additional 30-60 minutes simmering.

If you use red kidney beans, read the following, which I've copied from Wikipedia for convenience:

The toxic compound phytohaemagglutinin, a lectin, is present in many varieties of common bean but is especially concentrated in red kidney beans. Phytohaemagglutinin can be deactivated by cooking beans at 100 °C (212 °F) for ten minutes. However, for dry beans the U.S. Food and Drug Administration (FDA) also recommends an initial soak of at least 5 hours in water; the soaking water should be discarded.

Who said beans were boring?

While the beans are cooking, soak the salt pork to wash away some of its salt.

When the beans are done, gently strain them. Avoid shaking the colander, to prevent fraying or mushing the beans. Discard the cooking water.

Step 2: Bake the beans

In an oven proof pot, bring to a boil

  • 3 cups of water
  • 1 cup light or dark molasses
  • 2 tsp ground black pepper
  • 1/2 tsp ground cloves
  • optional: 1 tbsp salt

Gently stir in the beans along with

  • 8 oz salt port, cut into 1/2-inch cubes
  • 2 cups cupped onions

If necessary, stir in additional hot water to just cover the beans. Cover the pot and bake 4-5 hours until the liquid has thickened.

Saturday, September 3, 2011

16-segment LED from Active Surplus

Here's the pin-out of a mysterious 16-segment LED display we picked up last weekend from Active Surplus. Stamped on the top is "TR371 A 5G".

It has a common anode, at pin 18.

This is mostly for my own notes, in case I decide to do something with it later. Feel free to use at your own risk, not responsible for injuries sustained while ROFL, etc.

Wednesday, August 31, 2011

Using a 4511 to drive a 7-segment LED with an Arduino

An Arduino UNO can drive a 7 segment LED digit directly, but it takes seven output pins to do it. Additionally, your program is exposed to how the segments in the digit are wired to the Arduino.

A binary coded decimal (BCD) driver like the 4511 hides this level of detail for you. It takes 4 pins as input, another for latch, and drives the LED segments directly. You "tell" it what number to display, and it figures out which segments to light up.

The flipside to using the 4511 is you have to accept the way it draws digits like 6 and 9 without their tails. Also, it doesn't draw letters like A, b, C, d, etc. Well, using the 4511 is just an exercise, a stepping stone to a more sophisticated driver.

Anyhow, this is the code I whipped up in about an hour. I'm putting it in the public domain, so enjoy!

/*
 * Arduino UNO 4511 BCD to 7-digit LED driver
 *
 * 4511 pins 3 (lamp test), 4 (ripple blanking), and 16 (Vcc)
 * are connected to +5V on the Arduino UNO.
 *
 * 4511 pin 8 is connect to GND on the Arduino UNO.
 * The common cathode on the LED digit also connects to GND.
 * 
 * 4511 pins 9 through 15 connect to the LED digit as
 * appropriate.
 */
#define LATCH_ENABLE  13  // to pin 5 on the 4511
#define DATA1          1  // to pin 7 on the 4511
#define DATA2          2  // to pin 1 on the 4511
#define DATA3          3  // to pin 2 on the 4511
#define DATA4          4  // to pin 6 on the 4511

void setup()
{
  pinMode( LATCH_ENABLE, OUTPUT ) ;
  pinMode( DATA1, OUTPUT ) ;
  pinMode( DATA2, OUTPUT ) ;
  pinMode( DATA3, OUTPUT ) ;
  pinMode( DATA4, OUTPUT ) ;
}

// This macro tests bit 'b' in value 'v' and reports
// high or low as appropriate.
#define T(v,b)  (v & (1<<b) ? HIGH : LOW)

void show( unsigned int value )
{
  if ( value <= 9 )
  {
    // enable the latch so we can write
    digitalWrite( LATCH_ENABLE, LOW );
  
    digitalWrite( DATA1, T(value, 0) );
    digitalWrite( DATA2, T(value, 1) );
    digitalWrite( DATA3, T(value, 2) );
    digitalWrite( DATA4, T(value, 3) ); 
  
    // disable the latch now that we're done writing
    digitalWrite( LATCH_ENABLE, HIGH );
  }
}

void loop()
{
  for ( int i = 0; i <= 9; i++ )
  {
    show( i ) ;
    delay( 1000 ) ;  // msec
  }
}
The 4511 does a fine job driving a single 7-segment LED display, but it's old school compared to the MAX7219 which can drive up to eight of those displays. Here's a well written resource on the 7219. I'm going to try getting one soon.

Hitachi Z7K320

I had to make a snap decision today on whether to buy a new hard drive for my x220t. The x220t only takes 7mm drives, which are less common than the typical 9.5mm drive for most notebooks. So seeing a 7200rpm drive on sale really caught my eye.

Drive performance was my primary concern, capacity was secondary. Sadly, few people actually published benchmarks for this drive. Mostly I just found marketing hyperbole and speculation.

The folks at Red Hill were kind enough to share a formula that they found was consistently able to predict a hard drive's performance: (2 log(data transfer rate) / sqr(seek + latency)). The higher the number, the faster the drive should perform.

Since my x220t is at home, I had to guess what hard drive it actually uses. So I chose the Seagate Momentus Thin based on vague recollections and what specifications I knew (250GB, 5400rpm, 7mm thickness). (Update: yes, exactly right, the ST9250301AS.) Here are the relevant numbers:

DTR 300 MB/s
random read seek 14ms
average latency 5.6ms
calculated result 1.119

This is the drive that was on sale at newegg.ca:

Hitachi Z7K320:
DTR 300 MB/s
average read seek 13ms
average latency 4.2ms
calculated result 1.195

So a slight performance improvement, according to the forumla.

It's possible I am making an apples-to-oranges comparison because I had to use "random read seek" versus "average read seek". Also, I've seen conflicting numbers for the Momentus Thin. If its seek time is actually 11ms according to this, then it's faster than the Hitachi, which defies expectations.

After a little more searching, I found a comparison between the z7k320 against the z7k500:

*** TRAVELSTAR 7K500 ***
-----------------------------------------------------------------------
CrystalDiskMark 3.0 (C) 2007-2010 hiyohiyo
Crystal Dew World : http://crystalmark.info/ -----------------------------------------------------------------------
* MB/s = 1,000,000 byte/s [SATA/300 = 300,000,000 byte/s]

Sequential Read : 111.361 MB/s
Sequential Write : 112.255 MB/s
Random Read 512KB : 39.582 MB/s
Random Write 512KB : 49.046 MB/s
Random Read 4KB (QD=1) : 0.516 MB/s [ 126.0 IOPS]
Random Write 4KB (QD=1) : 0.772 MB/s [ 188.6 IOPS]
Random Read 4KB (QD=32) : 0.972 MB/s [ 237.4 IOPS]
Random Write 4KB (QD=32) : 0.787 MB/s [ 192.0 IOPS]

Test : 1000 MB [D: 0.0% (0.1/232.9 GB)] (x5)
Date : 2010/12/14 16:13:58
OS : Windows 7 Home Premium Edition [6.1 Build 7600] (x86)


*** TRAVELSTAR Z7K320 ***
-----------------------------------------------------------------------
CrystalDiskMark 3.0 (C) 2007-2010 hiyohiyo
Crystal Dew World : http://crystalmark.info/ -----------------------------------------------------------------------
* MB/s = 1,000,000 byte/s [SATA/300 = 300,000,000 byte/s]

Sequential Read : 107.458 MB/s
Sequential Write : 106.552 MB/s
Random Read 512KB : 43.852 MB/s
Random Write 512KB : 47.439 MB/s
Random Read 4KB (QD=1) : 0.578 MB/s [ 141.2 IOPS]
Random Write 4KB (QD=1) : 1.085 MB/s [ 264.9 IOPS]
Random Read 4KB (QD=32) : 1.037 MB/s [ 253.3 IOPS]
Random Write 4KB (QD=32) : 1.091 MB/s [ 266.3 IOPS]

Test : 1000 MB [D: 0.0% (0.1/298.1 GB)] (x5)
Date : 2010/12/16 17:01:09
OS : Windows 7 Home Premium Edition [6.1 Build 7600] (x86)

According to the xbitlabs roundup, the 7K500 was the fastest among a group of 500-750GB drives. Yet the z7k320 had higher random read and write numbers than the 500, according to the Italian benchmark. So it does look like the z7k320 is a real performer, and the answer is "GO! BUY! NOW!"

Saturday, August 27, 2011

Rohm LU-3011 LED display module

I found this at Active Surplus today for $1.50. It has eleven LA-301VL (7-segment common cathode displays) on a 2-layer pcb. Numbering the pins and digits from left to right, here's how the pins correspond to digits:
Digit1234567891011
Pin1234681012141618
With respect to the segments, here's the relationship between the segments and the pins on the PCB: I'll need to build a multiplexer to control the display. This should be interesting.

Saturday, June 4, 2011

Always have a camera with you..

.. even if it's "just" an N8. In my limited experience, chipmunks are incredibly hard to shoot. Normally they're skittish and don't come near humans. When bribed with a peanut, they don't stay long. And when they're on the move, they're fast. But yesterday a co-worker spotted this little guy while crossing the bridge that joins our building with the south parking lot.

The N8 was fully zoomed in (about 2x digital), and held about 10-15 cm from the subject. All the other settings were on automatic or default. I managed to get six shots off before I and not it(!) decided to move on. Miraculously, only one of those was blurry enough to warrant throwing away.

The above shot was enhanced in GIMP with a touch of unsharp mask (radius 1.0, amount 0.50, threshold 1) and cropped. Here's the entire set, shrunken by the upload process but otherwise unmodified:

Hat's off to @PhoneDaz and the rest of the N8 team!

Friday, June 3, 2011

USB rescue drives

Turning a USB thumb drive into a Linux rescue disk from Windows proved to be a little more time consuming that expected. Here's what I've found works:
  1. download the USB Universal Installer from here
  2. run the installer
  3. agree to the licensing terms
  4. select the distro you want (e.g. Ubuntu Rescue Remix 11.04)
  5. if necessary, download the iso (the installer may offer to find the URR iso.. it did for me!)
  6. if necessary, browse to the iso (again, the installer remembered where the URR iso was)
  7. select the thumb drive's drive letter (it should have already been formatted for FAT32)
  8. if desired, set a size for the persistent drive
Once that's done, do this to avoid further frustrations:
  1. browse to syslinux folder on the thumb drive
  2. open the syslinux.cfg file and make sure the initrd option points at /casper/initrd.gz instead of initrd.lz
That should be it, as far as I know.

Wednesday, May 25, 2011

My vimrc for Windows

I need gvim in Windows to support accented characters for my Latin homework. Adding
:set encoding=utf-8
to _vimrc helps with input. Now I can press
ctrl-k a -
to get lower-case 'a' with a macron. The next trick is to add
:set guifont=DejaVu_Sans_Mono:h10:cANSI
so another font is used. This actually displays the lower-case 'a' with a macron instead of a black rectangle. To see what fonts are available and to help in constructing the guifont arguments, type into vim
:set guifont=*
A font selection dialog will pop up. Choose a combination that works for you, then type
:set guifont
to see what needs to be put into _vimrc. By the way, I put _vimrc in C:\Documents and Settings\Administrator, which I figured out by typing
:echo $HOME
into vim.

Tuesday, May 17, 2011

Epson P-3000 hard drive upgrade #2

Since the old WD 1200BEVE drive was resetting (or something) whenever it was flipped around or jarred, I decided to get a Samsung HM160HC on sale from NCIX for about CAD 56 after tax. Here it is installed in the P-3000. Sorry about the poor lighting. The Epson P-3000 would not boot up if the entire drive (minus a bit for EPV_SYSTEM) was partitioned for data, so I did a some binary searching to find a working configuration. Here's what I finally settled on:
Disk /dev/sdb: 160.0 GB, 160041885696 bytes
255 heads, 63 sectors/track, 19457 cylinders
Units = cylinders of 16065 * 512 = 8225280 bytes
Sector size (logical/physical): 512 bytes / 512 bytes
I/O size (minimum/optimal): 512 bytes / 512 bytes
Disk identifier: 0xfa08a67c

Device Boot      Start         End      Blocks   Id  System
/dev/sdb1               1       16700   134142718+   c  W95 FAT32 (LBA)
/dev/sdb2           16701       19457    22145602+   f  W95 Ext'd (LBA)
/dev/sdb5           16701       16784      674698+   b  W95 FAT32
There's about 20GB of unused space, but at least the P-3000 boots up and behaves normally. Further tests are obviously required. Here's the interesting bit. If the first partition goes from 1 to 16701 (and all the other partitions are moved along appropriately), the P-3000 boots up normally but the menus are suddenly in Japanese! Same with numbers 16702 through 16703. I was able to reconfigure the P-3000 to use English again, but I didn't feel comfortable about it. If the first partition is configured to go from 1 to 16704, the P-3000 boots up normally. but the menus didn't make sense. They appeared to be in Korean, and I couldn't figure out how to change the language back to English. Using cylinders 16705 and beyond, the P-3000 wouldn't boot up beyond the "EPSON" screen. Here's how much space my P-3000 has now: And here are some numbers collected from data sheets:
FeatureFujitsu MHW2040ATSamsung HM160HC
Rated current0.55 A0.85 A
Rotational speed4200 RPM5400 RPM
Buffer size2 MB8 MB
Spin up current (max)0.9 A0.9 A
Read/write (typical)1.6 W2.0 W
Idle (typical)0.5 W0.6 W
Standby (typical)0.2 W0.25 W
Sleep (typical)0.1 W0.1 W
Acoustics (idle)1.5 Bel2.2 Bel
Subjectively, the Samsung seems as quiet if not quieter than the Fujitsu, despite what the data sheets say. I'll post again when testing is done. In the meantime, the usual disclaimers apply. My advice is: don't try this. I am not responsible for anything that happens if you try to replicate my results. You undertake any modifications at your own risk. If you format the wrong drive or part thereof, destroy your (or anybody else's) equipment, lose photos, videos, music, or other digital data, burn down your place of business or domicile, suffer any personal, financial, or material loss or injury, pull out your hair, go crazy, go bankrupt, get separated or divorced, or anything else, it won't be my fault. Remember that my experience, skill set, test cases, use-case scenarios, support network, and criteria for success are probably different from yours, so what looks good here may turn out to be disastrous for you. Update: my tests were successful. I was able to backup from an 8GB CF card about 16 times until the disk was full. I was also able to use the Epson Link2 Utility v1.21 to browse the drive. The Samsung drive is staying, the old Fujitsu is going into storage, and the WD has been turned into an external drive.

Monday, May 16, 2011

Fixing USB car chargers from eBay

A few months ago, in an accessory buying frenzy for my then-new N8, I ordered a couple of USB car chargers from eBay. The first one did not specifically say it was for the N8, but it didn't say it was for Apple either, so I took a chance with it. Disappointingly, it did not work. I ordered another one, this time in a bundle with a wall adapter and 3 micro USB cables. There was a choice of colours, so I ordered a pink one because that goes well with Subies. This model was advertised to work with the N8, but of course it didn't work. Some time passed. Recently, I helped put together two Minty Boost USB chargers, which showed that for some devices, pins 2 and 3 need to be shorted together. Inspired, I disassembled the pink one and soldered the pins together. Sadly, the N8 still wouldn't charge from it. Luckily I spotted this in a forum:
I found a similar problem: USB cigarette ligher (an expensive one) charger, and the phone (Nokia C7) won't charge. The solution was somewhat surprising. Some background info: in the USB plugs, there are 4 wires: +5 V, Ground, +Data, -Data. Only the first two is required for charging, but you have to do something with the rest. The spec says, they should be connected together either directly or through a maximum of 200 ohm resistor. However, in my charger (optimised for iPhone perhaps?) the +Data was connected to the +5 V through a 24K resistor, and likewise the -Data to the Gnd through a 24K resistor. Removing them and connecting the + and - Data through a 100 ohm resistor, the charger works perfectly. Too bad though, that you need a soldering iron for this...
Aha! After removing two resistors tying pins 2 and 3 to the power rails (and of course soldering pins 2 and 3 together), the charger works. The voltage between pins 1 and 4 is 5.24 V, and between 1 and 2-3 it's now 2.15V (it used to be ~3V). Mr Pink's circuit board. Green: solder bridge. Red: removed resistors. The other USB charger was trickier to disassemble because it is encased in a stainless steel sleeve, but after some prying it came apart. Same problem, same resolution, same results. Top: Mr Pink's resistors. Bottom: Mr Steel's resistors. There's no doubt in my mind that Mr Pink's components were placed and soldered by hand :(

Saturday, May 14, 2011

Epson P-3000 hard drive upgrade

Following Julius Lagula's instructions, I upgraded my Epson P-3000 from a 40GB hard drive to a WD 1200BEVE model. The difference is I did it using Linux. Here's what I did:
  1. Plug the P-3000 into my Linux desktop computer, which had a lot of unused disk space.
  2. Copy the contents of the BACKUP folder to the computer.
  3. At this point, don't make the mistake I made. Do not delete the contents of the BACKUP folder (or any folder) from your Linux desktop. Use the P-3000 if you want to do any cleaning up. It appears the P-3000 keeps an index of the backups somewhere, and if the contents of the folder suddenly disappear, the P-3000 doesn't know how to set things straight again. Nothing really bad will happen when you fire the P-3000 up, but you'll be left with a list of backups that aren't there any more and no easy way to get rid of them. If you made this mistake, just copy the backups back into the BACKUP folder and go to the next step.
  4. Unmount the P-3000.
  5. Using the P-3000, clean out the "Backup Files" and anything else (videos, pictures, music) you don't want to waste time copying over later, and which you have previously already backed up.
  6. Power down the P-3000.
  7. Disassemble the P-3000 using Julius Lagula's excellent guide.
  8. Plug the P-3000's 40GB drive into a external USB drive controller and connect it to the Linux desktop computer.
  9. At this point, you can copy the contents of the P-3000 folder to your hard drive, or use dd to copy the entire partition. The advantage of using dd is you'll get everything. The disadvantage of dd is it's slow, as it copies everything, including the blank space. Before you use dd, unmount the partition.
  10. If necessary, unmount the EVP_SYSTEM partition and use dd to make an image of it on the hard drive:
    dd if=/dev/sdb5 of=/bigdisk/image.sdb5.EVP_SYSTEM
  11. Using fdisk, make a record of the old drive's partitions:
    debian:~# umount /media/EPV_SYSTEM
    debian:~# umount /media/P-3000
    debian:~# fdisk /dev/sdb
    
    The number of cylinders for this disk is set to 4864.
    There is nothing wrong with that, but this is larger than 1024,
    and could in certain setups cause problems with:
    1) software that runs at boot time (e.g., old versions of LILO)
    2) booting and partitioning software from other OSs
    (e.g., DOS FDISK, OS/2 FDISK)
    
    Command (m for help): p
    
    Disk /dev/sdb: 40.0 GB, 40007761920 bytes
    255 heads, 63 sectors/track, 4864 cylinders
    Units = cylinders of 16065 * 512 = 8225280 bytes
    Disk identifier: 0x05e51aee
    
    Device Boot      Start         End      Blocks   Id  System
    /dev/sdb1               1        4780    38395318+   c  W95 FAT32 (LBA)
    /dev/sdb2            4781        4864      674730    f  W95 Ext'd (LBA)
    /dev/sdb5            4781        4864      674698+   b  W95 FAT32
    
  12. Unmount the 40GB drive.
  13. Attach the new drive to the external USB controller, and plug it into the desktop computer.
  14. Partition the drive using fdisk. For my new drive, the Units (cylinders of 16065 * 512 = 8225280 bytes) was the same as it was in the old drive. So I calculated how many cylinders sdb5 needed to be, and created sdb1 to fill the rest of the drive. To be more specific,
       Device Boot      Start         End      Blocks   Id  System
    /dev/sdb1               1       14509    c  W95 FAT32 (LBA)
    /dev/sdb2           14510       14593    f  W95 Ext'd (LBA)
    /dev/sdb5           14510       14593    b  W95 FAT32
  15. Set the types of the partitions as indicated above, namely sdb1=c, sdb2=f, sdb5=b.
  16. Format the partitions:
    mkfs -t vfat -n P-3000 /dev/sdb1
    mkfs -t vfat -n EPV_SYSTEM /dev/sdb5
    Optional: Include the -c option to check for bad blocks as the filesystem is being made. This significantly increases the time it takes for mkfs to run, but may be worth it.
  17. Copy the images back to the hard drive:
    dd if=/bigdisk/image/sdb5.EPV_SYSTEM of=/dev/sdb5
    mkdir /media/P3000
    mount /dev/sdb1 /media/P3000
    # If you used dd to save the P-3000 partition, do this:
    mkdir /media/loop
    mount -o loop /bigdisk/image.sdb1.P3000 /media/loop
    # Now copy the directories from the old P-3000 to the new one
    cp -aR /media/loop/* /media/P3000/
    cd /media/loop
    cp -aR .Trash* /media/P3000/
    cp -aR ._.Trashes /media/P3000/
    cp -aR .RATE /media/P3000/
    cp -aR .DS_Store /media/P3000/
    
  18. Use ls -aR | wc to compare the contents of /media/loop to /media/P3000.
  19. Unmount the new drive.
  20. Install into the P-3000 and reassemble
If all went well, you should be able to boot up the P-3000 and see 111GB (or so) free disk space. I have noticed one problem: sometimes a CF card backup will hang half-way through, and the only recourse is to power-down the system by removing the battery. It seems this is happens only when the P-3000 is moved in some significant way, e.g. flipped over or jarred. Backups continue to completion if the P-3000 is moved gently or left alone. Update: Yep, the WD Scorpio Blue (vintage Jan 2008) resets or something if it is rotated or moved too much, causing the backup process to hang. I reinstalled the Fujitsu 40GB, and could not repro the problem using the same motions. I'm going to try a Samsung drive next.

Smartphone followup

The verdict In the end, the Nokia N8 won, at least for me. Mrs Squirrel bought a second-hand Nexus One based on my research, and that device and OS is perfect for her. For me, the N8 has been a better fit. I ordered an unlocked, black version from Newegg.ca in December, received it a few days later, and have been enjoying it since. Let's break it down. Camera and xenon flash Much has already been written about N8's camera, and no other smartphone has yet to best it. The shutter-to-shot time could be faster. The Xenon flash is so close to the lens that red-eye (or in the case of cats, laser eye) is almost always present. But if you're serious about using your smartphone as a camera, the N8 is hard to beat. Compared to a point-and-shoot, the only thing missing is optical zoom. Making and receiving calls Though I don't spend much time talking on my N8, I've never dropped a call or been disappointed by the sound quality. By way comparison, my old Treo 650 frequently could not receive or make calls from inside buildings (even standing near a window), and it needed an app to boost the earpiece and mike volume. Mrs Squirrel makes lots of calls on her Nexus One, and is happy with it. WLAN During our recent vacation, Mrs Squirrel and her Nexus One was much quicker at connecting to public WiFi networks that require one to accept an agreement on a browser. But that might be attributable to Mrs Squirrel, who is brilliant, and not necessarily to the Nexus One. At home or on networks using WEP or WPA/WPA2, the N8 has no problems once the SSID and passkeys are entered. My N8 can even connect to the LEAP network at the office, something I've yet to configure my Linux laptop to do. 3G data The N8 has a pentaband 3G radio, but I'm too cheap to buy a data plan. I like not being tied to any service provider though. Battery life I can go 2 days without needing to charge my N8, whereas Mrs Squirrel frequently runs out. But this is likely a reflection of usage patterns too. The battery meter on the N8 could use some work though: the reading is usually higher than what other battery monitoring apps say. Operating system I'm ok with the Symbian OS that runs on the N8. Sure, it's not as tweakable, nice looking, and the app store is not as well stocked as Android or iOS, but it's perfectly serviceable. The long period from when PR 1.1 was announced to be available and when it actually released for my phone was regrettable, but at least it happened. This is one of the benefits of buying an unlocked phone, by the way. Earlier this month I played with an N8 that was locked to Smart, and PR 1.1 is still not available for it. Applications Nokia makes some nice apps for Symbian. I'm really happy with their Ovi Maps, Wellness Diary Beta, and Sleeping Screen. I haven't had a problem with the Ovi store. Their browser, Web, has gotten better with the recent updates, and I use it equally with Opera Mini. Other 3rd party apps that I use are Gravity, Best Timer, Best TaskMan, Best Jotter, Best Converter, Panorama, Pixelpipe, Offscreen's Anglemeter, and MobileKnox. My favourite games are Angry Birds, Doodle fit, and MicroPool. Case I used a cheap slip-on hard case from ebay, and upgraded to Otterbox's Commuter case as soon as it became available. The future I'm happy with my N8, and I'll probably keep using it until it breaks. Nokia has partnered with Microsoft and produce some Windows 7 phones, and there are rumours of a new N8, so we'll see what happens.