Monday, December 19, 2011

More SR3D Builder

As an exercise, I decided to try modeling the 8441 B-model (racer) in SR 3D Builder. I am getting the hang of this program, and quite enjoyed putting together the rear end of the vehicle. I'm pleased to report that SR3D allowed me to model the front end, thanks to the hinge mode and the connection solver.

The nose is composed of a 3x5 90 degree beam (yellow) posed at an angle thanks to pink connector block and the light-blue beams. There are 4 hinges in the nose. I positioned the pink connector block and the light-blue beam in approximately the right place, then used the connection finder to "connect" the holes in the light-blue beam and the yellow 90 degree beam. The software repositioned the two pieces. Neat!

The software did make a boo-boo during an early attempt: the connection finder positioned one of the pieces into another one. Of course that was easily undone, and a different strategy solved the connection.

Mecanum Wheels

These look exciting..

Sunday, December 18, 2011

Lego Digital Designer

After I posted the previous entry about modeling the synchro drive in SR 3D Builder, I decided to try doing it in Lego Digital Designer.

  • Good: I love the way axles and pins just snap into holes, and vice versa. Much easier than either SR 3D or MLCad. The current version of SR 3D (0.6.0.9) has a feature called "automatic brick orientation" which offers a similar ability, but it's still marked as experimental, and doesn't feel as snappy as LDD's.
  • Good: Pan, zoom, and orbit control with the mouse is just like Google Sketchup. In contrast, SR 3D requires you to use a slider to zoom, and I haven't figured out the pan controls yet. (Update: hold down the middle button or both left and right mouse buttons at the same time.)
  • Good/bad: Collision detection is very good, but can be intrusive. It won't let you drop a piece where it intersects with another.
  • Good/bad: The building guide was easily generated. The building guide is also animated, and can be rotated and zoomed. But it created structures which will not fit without some disassembly.
  • Bad: without a pin in place, the software could not figure out where to put a studless beam.
  • Bad: Limited selection of parts and colours. For example, the 1/2 thick triangle shaped beam only comes in grey, red or black. In my personal collection, I have this item in blue, from an old Star Wars set. In the other programs, there is a wider selection of colour and even transparencies. I really enjoyed the fact that I could make the turntable a light transparent blue. It's such a large piece that leaving it all black makes the other pieces harder to see.
  • Bad: The division of parts into themes seems unnecessary.
  • Bad: The 12-tooth bevel gear is filed under the "Extended" theme, as a "conical wheel, z12". It does not show up searching for "bevel" or "gear". It's also only available in red
  • Bad: Bevel gears have a problem fitting. Couldn't figure out a solution to this one.

Here's what I was able to do. It was pretty easy to throw it together because of how easily pins and axles just fall together. But I had to leave out one of the bevel gears, and substitute a cross thingy for the 3482 wheel.

Synchro Drive in Lego (part 2)

Hooray for Lego CAD software! Here's what I used:
  • SR 3D Builder: After a few hours of poking around, I found this to be the easiest and nicest looking program for building Technic models.
  • MLCad: to import SR 3D's files (just open all file types) and to edit / reorder the build steps.
  • LPub: to generate the build instructions.
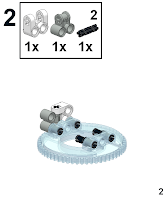
And here are the build instructions for my latest iteration of a syncro drive part:

Saturday, December 17, 2011

Synchro Drive in Lego

Here is my take on a synchro drive using Lego:

It's inspired by, but different from, aeh5040's creation in the following ways:

  • I used wheel 3482 and tire 3483 because I have a theory that it will help prevent "walking" when the mechanism is turned for steering. More on that theory later.
  • I used a 12-tooth bevel gear instead of a 20-tooth bevel gear, again to help prevent walking. I believe it is advantageous to employ a reduction in the final driving gears (perhaps because it means less torque in the vertical drive axis), so I may revisit this at another time.
  • The wheel is 1 stud further from the turntable to provide clearance for the wheel and tire. I admire the way aeh5040's design has just the right amount of space for it's pulley and tire. It feels "just so." But I couldn't replicate that with my tire choice. So the supporting triangles had to be attached to the turntable using parts 41678 and 32291.

My theory about walking is this. When the mechanism is turned for steering, the bevel gear attached to the wheel spins as it is rotated around the stationary drive axle. The amount it spins depends on the ratio between the two bevel gears. I chose the 12-tooth double bevel gear over the 20-tooth so the ratio would be 1:1. If the mechanism was "steered" 360 degrees, then the wheel would rotate 360 degrees as well.

I also believe that to prevent walking, the wheel's radius must be equal to its distance from the driving axle. Or, perhaps more correctly, the ratio of the wheel's radius and its distance from the driving axle must be equal(?) to the ratio between the two bevel gears.

I don't have time to draw up a diagram to explain this further, so I'll just leave it be for now.

Advantages of synchro drives in a robotics platform:

  • More energy efficient than scrub steering. This advantage is important if the robot is heavy or the surface has a high coefficient of friction.
  • Robot may be able to change direction quicker. For example, see this video.

Disadvantages of synchro drives in a robotics platform:

  • Robots built on a synchro platform driven by one motor do not rotate about their vertical axis. This is problematic if, for example, the mission involves gathering items off the floor and the intake is located only on one side of the robot. It's less of a problem if the mission allows for a swiveling "head" positioned on top. An obvious workaround to this problem is to employ two drive motors and find a way to counteract their different turning rates.
  • The steering and drive mechanisms take up a lot of room. In addition to the mechanism shown above, you need to add gears and axles to steer and to drive all four wheels from two motors. Compare this to a scrub-steer platform, which can be as simple as putting at each corner of the robot's frame a motor, 2 gears, and a wheel.

Some "final" notes about construction choices:

  • I used a longer-than-strictly-necessary axle for the wheel so it won't pop out during a competition.
  • The triangles can wobble because of the attachment method, so add an axle at each corner of their bases. To help position the triangles better, put bushings on the axles as well.

Additional resource: Sven Bottcher's Principles of robot locomotion

Tuesday, December 13, 2011

2005 Impreza headlight bulb replacement

I recently noticed that one of the low-beams in my 2005 Impreza had blown out. Upon closer inspection, both marker lights were gone too. Since the marker lights are incredibly difficult to access and since the plastic lenses have gotten cloudy, I decided to remove both headlights and work on them inside the house.

Removing the headlights was surprisingly straightforward, thanks to the instructions in the owner's manual and to these instructions on NASIOC. I just followed steps 1 through 8, and I had both headlights in the house in 30-45 minutes.

It was a balmy 5 degrees Celcius outside with little to no wind, so I was able to work in short sleeves. To combat the early onset of darkness, I used a Petzl 3-led headlamp and had on a small AAA necklight.

Both low beams got replaced by Sylvania XTRAVISION H1 XVs that I got from Crappy Tire for $29 per pair. The marker lights were 168LL (long life) jobbies from GE I think. Both got replaced as well, even though the left side marker light came back to life when I banged on the headlight. That worries me slightly. What worries me more is the right side marker light was just hanging outside the lamp assembly in its socket, like it hadn't been inserted properly the previous time. The light bulb was burnt out and cracked, which means it probably died due to exposure to rain or oil. That bulb was last changed at the dealership, but iirc, they didn't charge me for it.

The low beams are protected in the back by a large round plastic cover that was hard to twist off. The gasket had gotten dried, so I lubricated it with dielectric grease before reinstalling the covers. I also put a dab of dielectric grease on the plugs. Hope that wasn't the wrong thing to do...

To polish the lenses, I used Meguiare's PlastX. I hadn't done any research before I went shopping, so it was a toss up between that and RainX's version. The stuff works pretty good, and quickly. The finish on the lens feels like car wax. No surprise there, considering what Meguiar's is famous for. My lenses still have pits from stones and whatnot, though. To get a factory finish I'd probably have to break out the wet-dry sandpaper, which I didn't care to get into.

Reinstalling the headlights went quickly -- maybe 15 minutes. Again, the Petzl came in handy. All in all, I'm really pleased I decided to tackle the project tonight instead of waiting until the weekend. It went faster than I had feared it might, and now I have working lights up front again.

Next project: replace the dead bulb(s) in my instrument cluster.

Update: subjectively speaking, the work has been worth it. There seems to be more light coming out of the headlights. The colour temperature has not changed noticeably, which makes sense because the XVs are supposed to have a colour temperature of 3200K versus the stock 3100K. It's impossible to pin down which change made the biggest difference since I didn't do any controlled testing and I changed 3 (or possibly more) things in one go (cleaned lenses, replaced a broken low beam, replaced both low beams with new bulbs).

Also, I gave my console a friendly thump on the drive to work, and the dead light came back on. Who knew the Subie had so much in common with an Amiga 500?